
2020-08-15
344
原创
Nginx | Nginx的介绍和安装
本文字数:4355
,大约阅读2分钟一、Nginx 简介
Nginx 是互联网主流的高性能 http 和 反响代理 Web 服务器,Nginx 不但可以作为 Web 服务器,它还提供了静态资源服务、缓存、负载均衡 等功能。
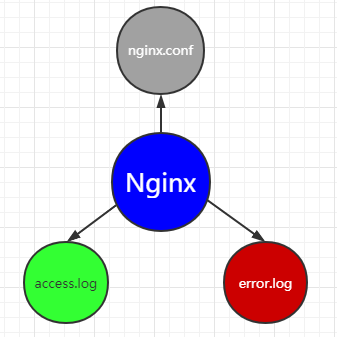
Nginx 有很多模块,并且也有很多程序员及组织参与 Nginx 模块的开发,为 Nginx 添砖加瓦。强大的 Nginx 的组成却并不复杂,它大体由四部分组成。
在中间位置的是 Nginx 的二进制文件,Nginx 的启动需要依赖 nginx.conf 配置文件,当我们使用浏览器访问 Nginx 服务器时,access.log 文件会记录浏览器的请求,当处理请求有错误时会把错误记录都记录到 error.log 文件中。
二、Nginx 的安装
Nginx 的安装按照步骤和套路基本上就可以了。
1、下载 Nginx 的源代码
[root@localhost ~]# wget https://nginx.org/download/nginx-1.18.0.tar.gz
2、解压源代码
[root@localhost ~]# tar -zxf nginx-1.18.0.tar.gz
3、安装 C 和 C++ 等编译工具
[root@localhost nginx-1.18.0]# yum install -y gcc
[root@localhost pcre-8.40]# yum install -y gcc-c++
[root@localhost pcre-8.40]# yum install -y cmake
4、下载安装 PCRE 依赖
PCRE(Perl Compatible Regular Expressions)是一个Perl库,包括 perl 兼容的正则表达式库。
[root@localhost ~]# wget https://netix.dl.sourceforge.net/project/pcre/pcre/8.40/pcre-8.40.tar.gz
[root@localhost ~]# tar -zxf pcre-8.40.tar.gz
[root@localhost ~]# cd pcre-8.40
[root@localhost pcre-8.40]# ./configure
[root@localhost pcre-8.40]# make && make install
5、生成 Makefile 文件
[root@localhost nginx-1.18.0]# ./configure --prefix=/usr/local/nginx
执行这步时,我这里有一个报错,提示如下:
./configure: error: the HTTP gzip module requires the zlib library.
You can either disable the module by using --without-http_gzip_module
option, or install the zlib library into the system, or build the zlib library
statically from the source with nginx by using --with-zlib=option.
这个报错提示是因为我本地没有安装 zlib 库,因此无法编译 http_gzip_module 模块,因此我们忽略这个模块的编译。
[root@localhost nginx-1.18.0]# ./configure --prefix=/usr/local/nginx --without-http_gzip_module
在执行完 ./configure 命令后,进入 objs 目录下,查看 ngx_module.c 文件,该文件中给出了准备要被编译进 Nginx 二进制文件中的模块,部分代码如下:
extern ngx_module_t  ngx_core_module;
extern ngx_module_t  ngx_errlog_module;
extern ngx_module_t  ngx_conf_module;
extern ngx_module_t  ngx_regex_module;
extern ngx_module_t  ngx_events_module;
extern ngx_module_t  ngx_event_core_module;
extern ngx_module_t  ngx_epoll_module;
6、编译安装 Nginx
[root@localhost nginx-1.18.0]# make
[root@localhost nginx-1.18.0]# make install
7、配置 nginx.service 文件
为了使用 systemctl 来管理 nginx 的启动、关闭等操作,需要创建一个 nginx.service 文件。
[root@localhost nginx]# touch /usr/lib/systemd/system/nginx.service
[root@localhost nginx]# vim /usr/lib/systemd/system/nginx.service
nginx.service 文件的配置如下:
[Unit]
Description=nginx
After=network.target

[Service]
Type=forking
ExecStart=/usr/local/nginx/sbin/nginx -c /usr/local/nginx/conf/nginx.conf
ExecReload=/usr/local/nginx/sbin/nginx -s reload
ExecStop=/usr/local/nginx/sbin/nginx -s quit
PrivateTmp=true

[Install]
WantedBy=multi-user.target
8、管理 Nginx 的启动与停止
启动 Nginx
[root@localhost nginx]# systemctl start nginx.service
停止 Nginx
[root@localhost nginx]# systemctl stop nginx.service
重启 Nginx 服务
[root@localhost nginx]# systemctl reload nginx.service
查看 Nginx 的状态
[root@localhost nginx]# sytemctl status nginx.service
在我们启动 Nginx 后,有可能会报错,这时使用 status 也可以查看 Nginx 的启动失败的原因。
设置 Nginx 开机启动
[root@localhost nginx]# systemctl enable nginx.service
禁止 Nginx 开机启动
[root@localhost nginx]# systemctl disable nginx.service
9、关闭防火墙
如果是新安装的 CentOS 7 系统,系统会开启防火墙,我们需要停止防火墙或者配置防火墙的策略。这里我们选择关闭防火墙。
[root@localhost nginx]# systemctl stop firewalld
10、访问 Nginx
打开浏览器,输入虚拟机的 IP 地址,就可以访问我们的 Nginx 提供的默认页面了。
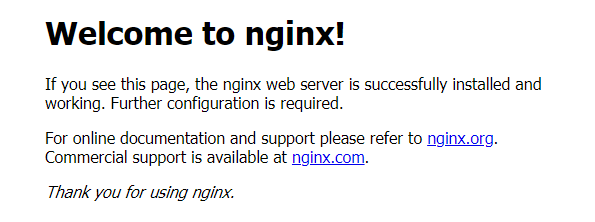
当我们看到这个页面,就说明 Nginx 安装成功了。
Nginx
反向代理
负载均衡

评论